Got an unusual request for help: "Is it possible to put the labels AFTER the post to BEFORE the post, like after the title? (I am using classic blogger template)". Note that the labels for this post - "hack", "template" and "widgets" are above this content and below the post title, meaning this hack had been implemented for this blog. For instruction, read on. You will read about both failure (which was expected, but I had to try it) and success.
I have not looked at a old classic template after New Blogger template, but suspect it should not be too difficult, but want to try it with New Blogger template first, hoping I can just do it in the LAYOUT using drag and drop, but not really expecting that to work.
Trial to move the label widget to under the post title via the LAYOUT
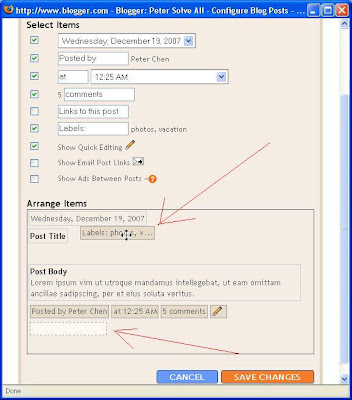
This is what I tried. Sign into blogger.com (Dashboard), click LAYOUT for the blog I want to test the hack (in this case, this blog itself). Look at the top of this post. You should notice that the labels "hacks" and "templates" are just below the Post title and not in its usual place at the bottom of the post. However, it was not done using drag and drop in the LAYOUT by trying to drag the widget for the labels from the bottom of the post section (the largest and widest section of the LAYOUT). See the screenshot below to see what I had tried to do:
The crucial positions are highlighted by red arrows. The arrow at the bottom points towards the original position of the label widget, now represented by an empty white box. What I had done was hover the cursor (mouse) over the label widget until the cursor changed to a cross, right-click, and while keeping the finger pressed down on the right button of the mouse, tried to drag the label widget to just under the post title as shown by the red arrow at the top. The usual step in moving widgets in LAYOUT is to release the right mouse button when you have got your widget where you want it to be. However (as expected), the moment I release the finger on the right mouse button, the label widget just flew back into its original position. Result - failure
IMPORTANT: Before editing your template, it is always advisable to backup both the template PLUS any Page Elements that can be backed up. See Backup New Blogger template PLUS Page Elements and change new template. Backing up Page Elements have been described in greater details at Backup Page Elements: How?.
To move the labels under the Post title, I have to get into the actual template itself by clicking the TEMPLATE tab (actually, when in the LAYOUT, this would already have been done and it is really not necessary to click on the TEMPLATE tab). Next click EDIT HTML sub-tab and this will open the template editor. Tick [ ] Expand Widget Templates and wait for the template to fully expand. Now comes the difficult part of how to move the labels widget.
In the expanded template, look for this block of codes:
This will be where we will paste the widget for the labels
<div class='post-body entry-content'>
<p><data:post.body/></p>
<div style='clear: both;'/> <!-- clear for photos floats -->
</div>
<div class='post-footer'>
This is how this part of the original template will look like. Note that the text in red is not in the template and has been added by me to show where you should paste the label widget later. Currently you can do nothing and the above is just to show how the template will be like before you edit the template, and the part where you should paste the label widget after you have found it, and cut it from its original position in the original template.
Now is the time to look for the label widget, shown in the scroll box below:
<b:include data='post' name='postQuickEdit'/>
</span>
</p>
<p class='post-footer-line post-footer-line-2'>
<span class='post-labels'>
<b:if cond='data:post.labels'>
<data:postLabelsLabel/>
<b:loop values='data:post.labels' var='label'>
<a expr:href='data:label.url' rel='tag'><data:label.name/></a><b:if cond='data:label.isLast != "true"'>,</b:if>
</b:loop>
</b:if>
</span>
</p>
<p class='post-footer-line post-footer-line-3'/>
</div>
</div>
The codes highlighted in red is the label widget. Highlight this, right-click, select "Cut" to put the codes into the clipboard, then scroll back to the part of the template shown in the first scroll box above, paste the label widget in the part where you see
This will be where we will paste the widget for the labels
Now, after you have done this, this is how that part of the template will look like:
<p class='post-footer-line post-footer-line-2'>
<span class='post-labels'>
<b:if cond='data:post.labels'>
<data:postLabelsLabel/>
<b:loop values='data:post.labels' var='label'>
<a expr:href='data:label.url' rel='tag'><data:label.name/></a><b:if cond='data:label.isLast != "true"'>,</b:if>
</b:loop>
</b:if>
</span>
</p>
<div class='post-body entry-content'>
<p><data:post.body/></p>
<div style='clear: both;'/> <!-- clear for photos floats -->
</div>
<div class='post-footer'>
Preview, and if satisfied, click "Save Template"
Note: If you have problems finding the codes mentioned above, refer to
